RSS
email
0

Silverlight


Microsoft® Silverlight™ is a cross-browser, cross-platform plug-in for delivering the next generation of .NET based media experiences and rich interactive applications for the Web. Silverlight offers a flexible programming model that supports AJAX, VB, C#, Python, and Ruby, and integrates with existing Web applications. Silverlight supports fast, cost-effective delivery of high-quality video to all major browsers running on the Mac OS or Windows.

  • Deliver media experiences and rich interactive applications (RIAs) for the Web that incorporate video, animation, interactivity, and stunning user interfaces.

  • Seamless, fast installation for users, thanks to a small, on-demand, easy-to-install plug-in that is under 2 megabyte (MB) in size and works with all leading browsers.

  • Consistent experiences between Windows-based and Macintosh computers without any additional installation requirements.

  • Create richer, more compelling Web experiences that takegreater advantage of the client for increased performance.

  • Stunning vector-based graphics, media, text, animation,and overlays that enable seamless integration of graphics and effectsinto any existing Web application.

  • Enhance existing standards/AJAX-based applications with richergraphics and media, and improve their performance and capabilities byusing Silverlight.


Showcase

Download
Read more
0

Google phone is coming, believe it or not


People who have seen Google's prototype devices say they aren't as revolutionary as the iPhone. One was likened to a slim Nokia Corp. phone with a keyboard that slides out. Another phone format presented by Google looked more like a Treo or a BlackBerry.


It's not clear which manufacturers might build Google wireless devices, though people familiar with the project say LG Electronics Co. of South Korea is one company that has held talks with Google.


Google has already lined up a series of hardware component and software partners and signaled to carriers that it's open to various degrees of cooperation on their part, the people say.
Google has developed a prototype cell phone that could reach markets within a year, and plans to offer consumers free subscriptions by bundling advertisements with its search engine, e-mail and Web browser software applications, according to a story published today in The Wall Street Journal.

Google is showing the prototype to cell phone manufacturers and network operators as it continues to hone the technical specifications that will allow the phone to offer a better mobile Web browsing experience than current products, the story said.


The move would echo another recent product launched by a phone industry outsider, Apple Inc.’s iPhone. But Google’s product would draw its revenue from a sharply different source, relying on commercial advertising dollars instead of the sticker price of at least $499 for an iPhone and $60 per month for the AT&T service plan.


Negotiating the fairest way to split those advertising revenues with service providers could be a big hurdle for Google, one analyst said. Another problem is the potential that consumers could be scared off by the prospect of listening to advertisements before being able to make phone calls, said Jeff Kagan, a wireless and telecommunications industry analyst in Atlanta.
Read more
0

Spry framework for Ajax


The Spry framework for Ajax is a JavaScript library for web designers that provides functionality that allows designers to build pages that provide a richer experience for their users. It is designed to bring Ajax to the web design community who can benefit from Ajax, but are not well served by other frameworks.

The Spry framework is a way to use the data capabilities that enable designers to incorporate XML, JSON or HTML data into their documents using HTML, CSS, and a minimal amount of JavaScript, without the need for refreshing the entire page. The Spry framework is HTML-centric, and easy to implement for users with basic knowledge of HTML, CSS and JavaScript. The framework was designed such that the markup is simple and the JavaScript is minimal. The Spry framework can be used by anyone who is authoring for the web in their tool of choice.


This is the 6th pre-release of Spry. In this release, we are introducing many asked-for features in the data realm: Nested Data Sets, JSON Data Sets, HTML Data Sets, some new widgets and a reworking of Spry Effects.

This is just the start of the project. We're releasing a preview build now so that you have plenty of time to give us feedback on what's working for you, and what isn't. Your feedback and participation is important to us as we build out the framework.


Demo

Get Spry framework
Read more
2

The Flex Online Compiler


The Flex Online Compiler allows you to experience Flex 2 for yourself, without needing to download or install anything. Of course, you really should download Flex Builder 2 to truly get a feel for Flex, but until you do so, you may use The Flex Online Compiler to compile and run MXML and ActionScript code.


Simply type your code below, and click the Try It! button. Start with code of your own, or use the select boxes below to select Flex code that you can tweak and modify as you see fit. Enjoy!

More here..
Read more
1

Yahoo! Flash Blog


check out what’s new at the Flash Developer Center on the Yahoo Developer New library up for download that adds some cool user interface components to Flash CS3. You’ll find an AutoComplete component, a Menu, a Tree, a TabBar, and my personal favorite, four different Charting components. All free and available under the terms of terms of the BSD license.

Yahoo Flash Platform Team

Yahoo Flash Developer Center - A central source for open source code and libraries, articles, videos, all related to Flash development.

Astra Flash Components - As mentioned above, it’s a user interface component library for Flash CS3 developed by Yahoo.

There also updated the Astra Web APIs library with new documentation.


here to yahoo blog
Read more
3

Creating custom flash menu:


Step1: Open New document in flash (Ctrl + N)

Step2: Select first frame, right-click and paste the below code in first frame

code contains explanations

var con:ContextMenu = new ContextMenu();//The ContextMenu class provides runtime control over the items in the Flash Player context menu, which appears when a user right-clicks (Windows) or Control-clicks (Macintosh) on Flash Player.
con.hideBuiltInItems();//Hides all built-in menu items (except Settings) in the specified ContextMenu object
var new_menu:ContextMenuItem = new ContextMenuItem("sara_blog", fun);//creating new menu item-fun is the event handler called on click
con.customItems.push(new_menu);//adding the new item to context menu
function fun() {
getURL("http://sara-intop.blogspot.com/","_blank")//calling new url on click
}
_root.menu = con;//Associates the ContextMenu object con


your are done now run flash and right click
Read more
0

Hide Flash right-click menu:


Step1: Open New document in flash (Ctrl + N)

Step2: Select first frame, right-click and paste the below code in first frame


code contains explanations

var con:ContextMenu = new ContextMenu();//The ContextMenu class provides runtime control over the items in the Flash Player context menu, which appears when a user right-clicks (Windows) or Control-clicks (Macintosh) on Flash Player.
con.hideBuiltInItems();//Hides all built-in menu items (except Settings) in the specified ContextMenu object
_root.menu = con;//Associates the ContextMenu object con


your are done now run flash and right click
Read more
1

Creating Dynamic Div - Display error in form validation:


Sometimes we use alert user about wrong information supplied .. instead of using alert we can display information in document itself..

here is the full code and code explanation follows..

<html>
<head>
<style type="text/css">
#error
{
margin:0 auto;
background-color:#FFFFCC;
border:#FF822F 1px solid;
}
</style>
<script language="javascript">
function fun()
{
if(document.getElementById('frm1').txt1.value=="")
{
var div_element=document.getElementById('error_full');
var str_error="<div id=\"error\">Enter Valid Name:</div>";
div_element.innerHTML=str_error;
}
else{
var div_element=document.getElementById('error_full');
var str_error="<div id=\"error\">Hi "+document.getElementById('frm1').txt1.value+" !!</div>";
div_element.innerHTML=str_error;

}
}
</script>
</head>
<body>
<div id="error_full"></div>
<form action="" id="frm1">
<input type="text" name="txt1"/>
<input type="button" value="Hello world!" onclick="fun();"/>
</form>
</body>
</html>


Code explanation

Style:
Styles can be applied using id or class, use #infront of style if we use id...and .(dot) if we use class.
Here we use id.
We supplied background color, boder information in style sheet..
<style type="text/css">

#error
{
margin:0 auto;
background-color:#FFFFCC;
border:#FF822F 1px solid;
}
</style>

HTML:
DIV with id error_full is where we create dynamic div
Form tag with textfield and button.
Button calls javascript function fun onclick..

<body>
<div id="error_full"></div>
<form action="" id="frm1">
<input type="text" name="txt1"/>
<input type="button" value="Hello world!" onclick="fun();"/>
</form>
</body>

Javascript:
getElementById('frm1') returns the element which has the id supplied as argument.
innerHTML=returns or writes the elements or text enclosed in the div

<script language="javascript">
function fun()
{
if(document.getElementById('frm1').txt1.value=="")
{
var div_element=document.getElementById('error_full');
var str_error="<div id=\"error\">Enter Valid Name:</div>";
div_element.innerHTML=str_error;
}
else{
var div_element=document.getElementById('error_full');
var str_error="<div id=\"error\">Hi "+document.getElementById('frm1').txt1.value+" !!</div>";
div_element.innerHTML=str_error;

}
}
</script>
Read more
0

Free photoshop brushes


Photoshop brushes are easy way to create amazing artistic effects , some of the free brushes are there ..., i found some useful brushes and the links are here


more...
more...
Read more
0

Photoshop shortcuts


Photoshop shotcuts may be useful to make you peoples great designer and i found these photoshop shortcuts ...


  • Press Tab will hide tool bar and palette, Shift+Tab will hide only palette.

  • Hold Shift + click the top blue bar for toolbar and palette will move them to the nearest edge.
  • Double click the top blue bar, on any palette window, to minimize it.

  • Double click the gray background will bring up open file option, Hold Shift+double click will open up the browser.

  • Sick of the default gray background around your image? Select paint bucket, hold shift and click on the gray background, it will change to whatever color you have in your foreground color box.

  • In Photoshop, all "Cancel" buttons in a window can be changed to a "Reset" button by holding Alt.

  • Caps lock will switch your cursor for accuracy.

  • Press F button, it will switch between 3 different screen modes and give you more working area.


  • To draw a straight line, click then move to the end point and hold shift + click.

  • Hold Ctrl will temporary make any tool into move tool until you release Ctrl.

  • Ctrl + Alt and click drag the image, it will make a duplication of the current image over lay on top.

  • Hold Space bar, it will make any tool into "Hand Tool" until you release Space bar.

  • While in Zoom Tool, Ctrl+space = zoom in, alt+space = zoom out.

  • Hold Ctrl and press "+" or "-" it will change the % for image in navigator window.

  • When Using eyedropper tool to capture foreground color, hold Alt and click, it will instantly capture the color for background.

  • With Measure Tool, draw a line then hold Alt and draw another line from the end of the first line, it will measure the angle.

  • Ctrl+Alt+Z and Ctrl+Shift+Z will go back and forth in the history.

  • Alt+Backspace and Ctrl+Backspace will fill in the whole screen with foreground color or background color, Shift+backspace will bring up option window, Alt+Shift+Backspace and Ctrl+Shift+Backspace, will fill the image with foreground or background color but will leave the alpha transparent area alone.

  • When free transforming with Ctrl+T, hold Alt to keep the original image and then to transform a duplicated layer of it. Ctrl+Shift+T to repeat whatever you did in the last transform.

  • To make sure your Crop is on the edge of the image, hold Ctrl while cropping.

  • Ctrl+J will duplicate the current layer.

  • Ctrl+Shift+E will merge all visible layers to one layer, Ctrl+Shift+Alt+E will make a copy of the original and merge all visible layers.

  • While using Marquee Tools, hold Alt it will make the starting point as a center of the selection.

  • Ctrl + D to deselect, Ctrl+Shift+D to reselect what you deselected.

  • Hold Alt while clicking on the eye icon beside the layer, it will hide all other layers.

  • Hold Alt while clicking the pen icon beside the layer, it will unchain this layer from all layers.

  • Select a layer, hold Alt and click the top edge of another layer, it will group them.

  • Hold Alt and click the button "Create a new layer", it will create a new adjustment layer.

  • Select a layer and hold Alt, then click on the garbage can button. It will instantly delete the layer, marquee where you want alpha and Ctrl+click the "Create new channel" button, it will create an alpha only on the area you marquee.

  • Ctrl+Tab allows you to switch between different image files you are working on.

  • F12 = Revert to how the file was the last time you saved it.
Read more
0

Loader animation


HI friends,


i found a site contains app to generate loading animated gifs that can be more useful to you peoples


more here
Read more
1

Dynamic Image gallery(Fade_In_Out):


This is simple dynamic gallery to Fade in out images...

Note: Using flash8.....


Step1: Open New document in flash (Ctrl + N)


Step2: Select first frame, right-click and paste the below code in first frame

code contains explanations


//importing tween classes
import mx.transitions.Tween;
import mx.transitions.easing.*;
//variables declaration------>
var delay:Number = 5000;//interval between tweens
//array containing image urls
var data_arr:Array = ["http://imagecache2.allposters.com/images/pic/NIM/AF605~Flowers-and-Butterflies-Posters.jpg", "http://www.global-b2b-network.com/direct/dbimage/50322257/Sun_Flowers.jpg", "http://img.alibaba.com/photo/50637711/Simulated_Silk_Luau_Leis__Hibiscus_Flowers.jpg", "http://www.highlandcountryweddings.co.uk/flowers1.jpg"];
var current_num:Number = 0;
var first_num:Number = 0;
_root.createEmptyMovieClip("image_holder", _root.getNextHighestDepth());//empty Movieclip
_root.image_holder._x = 0;
_root.image_holder._y = 0;
//moviecliploader class
var mcl_lis:Object = new Object();
var mcl:MovieClipLoader = new MovieClipLoader();//moviecliploader class to load external files
mcl.addListener(mcl_lis);//adding listener to moviecliploader class
//calling the function for firsttime
load_image();
//
function load_image() {
mcl.loadClip(_root.data_arr[_root.current_num], _root.image_holder);//loading image in the holder
//looping the array values
if (_root.current_num>=data_arr.length-1) {
_root.current_num = _root.first_num;
} else {
_root.current_num++;
}
}
//load init function called when image start loading
mcl_lis.onLoadInit = function(target_mc:MovieClip) {
var obj:Tween = new Tween(target_mc, "_alpha", Normal.easeIn, 0, 100, .8, true);
//timer function to hold tween for some secs
var timer = getTimer();
_root.interval = setInterval(function () {
if ((getTimer()-timer)>delay) {
var obj:Tween = new Tween(target_mc, "_alpha", Normal.easeIn, 100, 0, .8, true);//Tween alpha of Mc from 100 to 0 in duration .8 seconds
obj.onMotionFinished = function() {
load_image();//loading next image from array
};
clearInterval(_root.interval);
}
}, 30);
};
Read more
1

Tweening Filters in flash:


After completing this tutiorial you can learn using MovieclipLoader class, and Tweening flash filters..

Note :Requiremet for this tut is Macromedia Flash8

Step1: Open New document in flash (Ctrl + N)

Step2: Select first frame, right-click and paste the below code in first frame

code contains explanations

import flash.filters.*;//importing all the filter class files
import mx.transitions.Tween;//importing all the tween class files
import mx.transitions.easing.*;
_root.createEmptyMovieClip("imageHolder", _root.getNextHighestDepth());//creating runtime movieclip to hold image
System.security.allowDomain("http://emiliewood.com/photos/july2005/17-july-05-flowers.jpg");//allowing flash to load files from other domain
//creating listerner object for movieclip loader class
var mcl_lis:Object = new Object();
//movieclip loader class to load external files
var mcl:MovieClipLoader = new MovieClipLoader();
//adding listener to moviecliploader class
mcl.addListener(mcl_lis);
//loading image file using moviecliploader class
mcl.loadClip("http://emiliewood.com/photos/july2005/17-july-05-flowers.jpg", _root.imageHolder);
//onloadinit function called once image loaded
mcl_lis.onLoadInit = function(target_mc:MovieClip) {
//tweening blur filter 5 -0 in 2 secs-- and applying dropshawdow using tween class
var myTween:Tween = new Tween(target_mc, "blur", Strong.easeInOut, 5, 0, 2, true);
myTween.onMotionChanged = function() {
target_mc.filters = [new BlurFilter(target_mc.blur, target_mc.blur, 1), new DropShadowFilter(1, 90, 0x000000, .8, 1, 1, 1, 1)];
};
};
Read more
3

FadeInOut text animation In ActionSctipt:


From this script you can learn how to use Tween class, Interval, Font embed,...


Step1: Open New document in flash (Ctrl + N)

Step2: Embed Font in flash

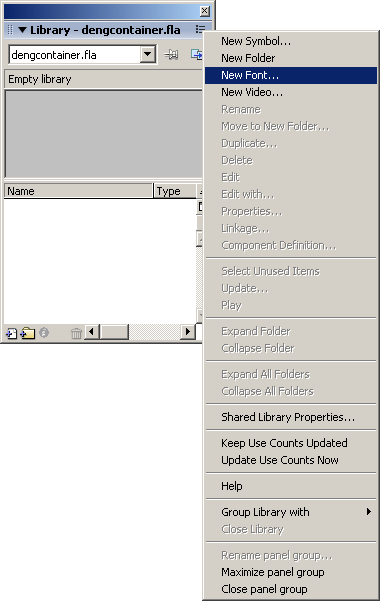
Open the Library panel (Ctrl+L).

Add a font to your library

Click the options menu in the upper right corner of the panel(just below close button)


Select New Font from the menu.

In the Font Symbol Properties dialog box select the font, size and style that you want and give the font combination a name.

Click OK to close the dialog box.

Right-click the font symbol in the library and select Linkage from the contextual menu.

In the Linkage Properties dialog box, click the Export for ActionScript button to enable both the Identifier and AS 2.0 Class text input fields.


Leave the default Identifier value and click OK to close the dialog box.

Note: Identifier value is used in actionscript

Step3: Identifier value used in this tut is myfont

Step4: Select first frame, right-click and paste the below code in first frame

code contains explanations


//importing tween classes
import mx.transitions.Tween;
import mx.transitions.easing.*;
//variables declaration------>
var delay:Number = 5000;//interval between tweens
var data_arr:Array = ["sara", "muzu", "asan", "ramesh", "prasath", "kalis", "babu", "mathan"];
var current_num:Number = 0;
var first_num:Number = 0;
//text_format ------------>
var txt_fmt:TextFormat = new TextFormat();
with (txt_fmt) {
font = "myfont";//identifier used in font embed
size = 20;//font size
color = "0x000000";//font color
}
_root.createEmptyMovieClip("text_holder", _root.getNextHighestDepth());//empty Movieclip
_root.text_holder.createTextField("txt1", _root.text_holder.getNextHighestDepth(), 0, 0, 0, 0);//textfield
_root.text_holder._x = 100;
_root.text_holder._y = 100;
load_data();


//load data function sets text and apply text format
function load_data() {
_root.text_holder.txt1.embedFonts = true;
_root.text_holder.txt1.autoSize = "left";
_root.text_holder.txt1.text = _root.data_arr[_root.current_num];
_root.text_holder.txt1.setTextFormat(txt_fmt);
var obj:Tween = new Tween(_root.text_holder, "_alpha", Normal.easeIn, 0, 100, .8, true);//Tween alpha of Mc from 0 to 100 in duration .8 seconds
obj.onMotionFinished = function() {
transition();
};
//checking the lenght of the array to loop
if (_root.current_num>=data_arr.length-1) {
_root.current_num = _root.first_num;
} else {
_root.current_num++;
}
}

//function transition hold the tween for 5 seconds
function transition() {
var timer = getTimer();
_root.interval = setInterval(function () {
if ((getTimer()-timer)>delay) {
var obj:Tween = new Tween(_root.text_holder, "_alpha", Normal.easeIn, 100, 0, .8, true);//Tween alpha of Mc from 100 to 0 in duration .8 seconds
obj.onMotionFinished = function() {
load_data();//loading next data from array
};
clearInterval(_root.interval);
}
}, 30);
}
Read more
5

Resize image Dynamically(proportionally) in flash as2/as3


1)Open new document in flash(ctrl+N)

2)Select first frame, right-click and paste the below code in first frame

3)Code contains explanations commented
//variable declarations to hold the values
var thisWidth:Number;
var thisHeight:Number;
var maximumHeight:Number;//height to which movieclip to be resized
var maximumWidth:Number;//width to which movieclip to be resized
var oldx:Number;
var oldy:Number;
var ratio:Number;
var mclis:Object = new Object();//An object that listens for a callback notification from the MovieClipLoader event handlers.


mclis.onLoadInit = function(target_mc:MovieClip) {//Invoked when the actions on the first frame of the loaded clip have been executed
_root.thisHeight = target_mc._height;//loaded movieclip height
_root.maximumHeight = 100;
_root.thisWidth = target_mc._width;//loaded movieclip width
_root.maximumWidth = 100;
ratio = thisHeight/thisWidth;//calculation ratio to which resize takes place

if (thisWidth>maximumWidth) {
thisWidth = maximumWidth;
thisHeight = Math.round(thisWidth*ratio);
}
if (thisHeight>maximumHeight) {
thisHeight = maximumHeight;
thisWidth = Math.round(thisHeight/ratio);
}
target_mc._width = thisWidth;//applying new width
target_mc._height = thisHeight;//applying new height
target_mc._x = 10;
target_mc._y = 10;
};
var mcl:MovieClipLoader = new MovieClipLoader();//MovieClipLoader class lets you implement listener callbacks that provide status information while SWF, JPEG, GIF, and PNG files are being loaded into movie clips.
mcl.addListener(mclis);//add the object as listener for event handlers
_root.createEmptyMovieClip("holder_mc", _root.getNextHighestDepth());//holder movieclip
_root.mcl.loadClip("http://www.atpm.com/11.02/nature/images/blue-flower.jpg", _root.holder_mc);//You can use the loadClip() method to load one or more files into a single movie clip or level;


__________________________________________________________________

Actionscript3.0

Resize.as
************

/**Do not delete the lines below
* @author: Saravanan
* @url: http://www.sara-intop.blogspot.com.com
* ---------------------------------------------------------------------
* @usage: Resize the assets dynamically
* ---------------------------------------------------------------------
*/
package com.classes{
import flash.display.MovieClip;
public class Resize extends MovieClip {
/*Constant variables-----------*/
/*Private variables-----------*/
private var _thisWidth:Number;
private var _thisHeight:Number;
private var _maximumHeight:Number;
private var _maximumWidth:Number;
private var _ratio:Number;
/*Public variables-----------*/
public var __height:int;
public var __width:int;

/**
* Constructor Function Resize
* Calculating the Height and Width from input values against Maximum height and Width
* @param thisWidth representing orginal height of the Object
* @param thisHeight representing orginal width of the Object
* @param maximumHeight||maximumWidth is the bound of the result
*/
public function Resize(thisWidth:int,thisHeight:int,maximumHeight:int,maximumWidth:int) {
this._thisWidth = thisWidth;
this._thisHeight = thisHeight;
this._maximumHeight = maximumHeight;
this._maximumWidth = maximumWidth;
this._ratio = this._thisHeight/ this._thisWidth;
calculate()
}
private function calculate() {

if ( this._thisWidth>this._maximumWidth) {
this._thisWidth = this._maximumWidth;
this._thisHeight = Math.round( this._thisWidth*this._ratio);
}
if ( this._thisHeight>this._maximumHeight) {
this._thisHeight = this._maximumHeight;
this._thisWidth = Math.round(this._thisHeight/this._ratio);
}
this.__height=this._thisHeight;
this.__width=this._thisWidth;
}
}
}


Usage

import com.classes.Resize;
var _resize:Resize=new Resize(_material_mc.width,_material_mc.height,300,200);


access the result height and width by
_resize.__width
_resize.__height


Related posts

Preloading in FlashCS3

3D rotation of Images using FlashCS3:
Read more
6

Color picker in flash:


Step1:
Save the color spectrum image to local disk


Step2:
Import into flash (ctrl+r) or File-import-import to stage..

Step3:
select image and convert to symbol (ctrl+F8) or Modify--conver to symbol.. Name it as spectrum

Step4:
Select the Movieclip in Stage and name it as img_mc in the property window

Step5:
Draw rectangle using rectagle tool and convert to symbol, name it as rect

Step6:
Select the Movieclip rect in Stage and name it as target_mc in the property window

Step7:
Place the code below in the first frame..(right-click firstframe--select actions-paste the code in actions panel)


import flash.display.*;//Bitmap data class contained in display package
import flash.geom.*;//colorTransform contained in geom package
var image_bitmap = new BitmapData(img_mc._width, img_mc._height);//The BitmapData object to draw.
image_bitmap.draw(img_mc);//Draws a source image or movie clip onto a destination image
onMouseMove = function () {
if (img_mc.hitTest(_xmouse, _ymouse, true)) {//on moving mouse over movieclip
var curr_color:Number = image_bitmap.getPixel(img_mc._xmouse, img_mc._ymouse);//Returns an integer that reresents an RGB pixel value from a BitmapData object at a specific point (x, y).
var preview_colortansform = new ColorTransform();//The ColorTransform class lets you mathematically adjust all of the color values in a movie clip
preview_colortansform.rgb = curr_color;//The RGB color value for a ColorTransform object
target_mc.transform.colorTransform = preview_colortansform;
trace(curr_color.toString(16));//returning string value
}
};

Step8:
The color picker for your project........!
Read more
 

Recent Posts

Recent Visitors

Donate Me

About Me

My photo
Chennai, Tamil nadu, India
Nothing more to say about me.. Just a Action Script programmer / Flex developer having 4.5 years of experience.