RSS
email
0

BlazeDS -Server BasedJava Remoting


Welcome to the BlazeDS beta release on Adobe Labs. BlazeDS is the server-based Java remoting and web messaging technology that enables developers to easily connect to back-end distributed data and push data in real-time to Adobe® Flex™ and Adobe AIR™ applications for more responsive rich Internet application (RIA) experiences.

The evolution to more engaging RIAs has created the need for better data connectivity options. Remoting simplifies the reuse of existing server logic automatically marshalling calls between the Flash client and the Java methods on the server. In addition, the use of a AMF binary data transfer format increases performance, allowing applications to load data up to 10 times faster than with text-based formats such as XML or SOAP.

Previously available only as part of Adobe LiveCycle® Data Services ES, Adobe is announcing its plans to contribute the proven BlazeDS technologies to the community under the LGPL v3. BlazeDS gives the rapidly growing Adobe developer community free access to the powerful remoting and messaging technologies developed by Adobe.


More..

Read more
0

Google-OpenSocial


The web is more interesting when you can build apps that easily interact with your friends and colleagues. But with the trend towards more social applications also comes a growing list of site-specific APIs that developers must learn.

OpenSocial provides a common set of APIs for social applications across multiple websites. With standard JavaScript and HTML, developers can create apps that access a social network's friends and update feeds.


Many sites, one API

Common APIs mean you have less to learn to build for multiple websites. OpenSocial is currently being developed by Google in conjunction with members of the web community. The ultimate goal is for any social website to be able to implement the APIs and host 3rd party social applications. There are many websites implementing OpenSocial, including Engage.com, Friendster, hi5, Hyves, imeem, LinkedIn, MySpace, Ning, Oracle, orkut, Plaxo, Salesforce.com, Six Apart, Tianji, Viadeo, and XING.

In order for developers to get started immediately, Orkut has opened a limited sandbox that you can use to start building apps using the OpenSocial APIs.


More..

Read more
0

Detecting MouseWheel in Flash8


Some time we need to scroll MovieClip using MouseWheel , here it is feel free to use ..

file structure(same location)

-MouseWheel.as

-TestmouseWheel.fla


Step1: open New ActionScript class file
Paste the code below

//////////code starts
/////////////////////////////////////////////
// http://sara-intop.blogspot.com //
/////////////////////////////////////////////


//importing the required class
import mx.utils.Delegate;
class MouseWheel extends MovieClip {
/////////////////////////////////////////////
// private variables
//
private var __target:MovieClip;
private var _mouseLis:Object;
/////////////////////////////////////////////
// Constructor function
//
public function MouseWheel(target:MovieClip) {
this.__target = target;
this._mouseLis = new Object();
Initiate();
}
/////////////////////////////////////////////
// private function
//
private function Initiate():Void {
//Using Delegate Class to create listener function, to get class scope to Listener function
_mouseLis.onMouseWheel = Delegate.create(this, DetectMouse);
//adding Listener to mouse
Mouse.addListener(this._mouseLis);
}
//@Param delta contains +3 to -3 depends on the mouse wheel direction
private function DetectMouse(delta):Void {
//Detecting Mouse is over the target MovieClip
if (this.__target.hitTest(_root._xmouse, _root._ymouse, true)) {
this.__target._y += delta;
}
}
//DisposeListener Method to remove listener Objects
public function DisposeListener(_object:MouseWheel):Void{
Mouse.removeListener(_object._mouseLis);
delete _object._mouseLis;
}
}

//////////code ends


Note: save file as MouseWheel.as

Step2: Open New Flash document , Save as TestmouseWheel.fla

Step3: Draw any Rectangular shapes and conver them to MovieClip

Step4: Give any istance name to the MovieClip

Step5: Add the code below in first frame

//////////code starts
var testMouse:MouseWheel = new MouseWheel(_mc);
//////////code ends

Note: _mc is the instance name given in Step4


Code Expanation:


class MouseWheel extends MovieClip {

MouseWheel is the Class name should be same as file name that inherits properties and methods
from MovieClip Class


public function MouseWheel(target:MovieClip) {
this.__target = target;
this._mouseLis = new Object();
Initiate();
}


A Constructor function Will have same name as Class name and File name, will be initiated
when an Object is instatiated from the Class
Here we are passing MovieClip for which we need scroll function
Also we associate the values with the Object
Here this means respective Object of MouseWheel Class


private function Initiate():Void {
//Using Delegate Class to create listener function, to get class scope to Listener function
_mouseLis.onMouseWheel = Delegate.create(this, DetectMouse);
//adding Listener to mouse
Mouse.addListener(this._mouseLis);
}


In Initiate Method we are addListener to Mouse trough Delegate Class
We are using Delegate class to make listener function to class scope means if we dont use Delegate Class
then the this inside listener function denotes listener function itself not the MouseWheel Object


//@Param delta contains +3 to -3 depends on the mouse wheel direction
private function DetectMouse(delta):Void {
//Detecting Mouse is over the target MovieClip
if (this.__target.hitTest(_root._xmouse, _root._ymouse, true)) {
this.__target._y += delta;
}
}

We ar checking If Mouse position is over the MovieClip we are going to scroll


public function DisposeListener(_object:MouseWheel):Void{
Mouse.removeListener(_object._mouseLis);
delete _object._mouseLis;
}

We can Call this Method once we dont need the Listener to listen mouse wheel
in fla

var testMouse:MouseWheel = new MouseWheel(_mc2);
_btn.onRelease = function() {
testMouse.DisposeListener(testMouse);
};

Here we are disposing any listener
Read more
9

Fullscreen browser in Flash


Here is a nice trick to make flash full screen from browser
Code here is for flash8, soon you can expect for AS3

1) Create New document save it some where in local drive

2) Create button in flash and be sure the button is selected and hit F9
Paste the below code

on (press) {
if (Stage["displayState"] == "normal") {
Stage["displayState"] = "fullScreen";
}else
Stage["displayState"] = "normal"
}


3) Press Shift + F12 (or) file->publish
This will create swf and html file

4) Edit html file usinh notepad; find param tags add the param tag below to the params in html and save
<param name="allowFullScreen" value="true"/>

5) Run the html


Code Explanation:
Stage["displayState"] this holds the fullsceen or normal value of the flash player
And we simply toggling these values


Note:
This will work only if flash player 9, no problem if u have flash8 software

Install flash9_player
Read more
0

Adobe’s latest online offering codenamed "Share"


Welcome to a preview of Adobe’s latest online offering codenamed "Share", a free web-based service that allows you to easily share, publish and organize your documents.

With Share you can:


  • Send documents without email attachments.

  • Access your documents from anywhere.

  • View all the documents you have shared or received in one place.

  • Post a link to your document on a wiki or blog.

  • Embed a Flash® preview of your document on any website.

  • Limit access to a document to a list of recipients.

more..

Read more
0

Android - An Open Handset Alliance Project


Android is a software stack for mobile devices that includes an operating system, middleware and key applications. This early look at the Android SDK provides the tools and APIs necessary to begin developing applications on the Android platform using the Java programming language.

Features
Application framework enabling reuse and replacement of components
Dalvik virtual machine optimized for mobile devices
Integrated browser based on the open source WebKit engine
Optimized graphics powered by a custom 2D graphics library; 3D graphics based on the OpenGL ES 1.0 specification (hardware acceleration optional)
SQLite for structured data storage
Media support for common audio, video, and still image formats (MPEG4, H.264, MP3, AAC, AMR, JPG, PNG, GIF)
GSM Telephony (hardware dependent)
Bluetooth, EDGE, 3G, and WiFi (hardware dependent)
Camera, GPS, compass, and accelerometer (hardware dependent)
Rich development environment including a device emulator, tools for debugging, memory and performance profiling, and a plugin for the Eclipse IDE


The Open Handset Alliance, a group of more than 30 technology and mobile companies, is developing Android: the first complete, open, and free mobile platform. To help developers get started developing new applications, we're offering an early look at the Android Software Development Kit.


More..
Read more
0

Adobe Flash Player -Code names


Some of the interesting code names for Adobe Flash Player

MovieStar---->it includes H.264 standard video support – the same standard deployed in Blu-Ray and HD-DVD high definition video players. In other words, the quality of video has been substantially improved from the previous version of Flash Player 9. Also added to the mix is High Efficiency AAC (HE-AAC) audio support and “hardware accelerated, multi-core enhanced full screen video playback”.

FrogStar ----->That new feature is the ability for the Flash Player to cache the Flex framework on the local machine, meaning the file size of a Flex based SWF will be dramatically smaller.

Astro--------->Flash player 10
Read more
0

Flash player 10 (Astro)


Hi ,

Adobe moving towards flash player 10, with some extra features that includes

1)Live video preview in flv player

2)More filters

3)Rigging like feature for objects

4)More text features

5)3d features


i got some links of these features , hope you will enjoy these features too

1-sneak peek
2-sneak peek
Read more
0

Button Events in Flex2.0


Create new Flex project in flex editor..select basic radio and choose next then enter project name and finish..


Wow you are in flex coding part

<?xml version="1.0" encoding="utf-8"?>
<mx:Application xmlns:mx="http://www.adobe.com/2006/mxml" layout="absolute">
<mx:Button id="button1" label="Click me" x="100" y="100" />
</mx:Application>


this is way for creating button in flex we have given

id name which is used to refer the button later in actionscript or mxml

Label is the text displayed in Button

Then x y values to position button


Handling Events


<?xml version="1.0" encoding="utf-8"?>
<mx:Application xmlns:mx="http://www.adobe.com/2006/mxml" layout="absolute">
<mx:Script>
<![CDATA[
import flash.net.URLLoader;
import flash.net.URLRequest;
public function launch(evt:MouseEvent):void{

navigateToURL(new URLRequest("http://sara-intop.blogspot.com"));

}
]]>
</mx:Script>
<mx:Button id="button1" label="Click me" x="100" y="100" click="launch(event)"/>
</mx:Application>


Here we are going to write our button handler using Actionscript using mx:script tag
we are calling launch method in click event.

and navigating to url similar to getURL in flash8
Read more
0

Flex Basics


HI,
Every body know what Adobe Flex is , if not

Flex2.0 (open_source) is a framework uses MXML language to output swf , that contains series of process.

Flex uses flexbuilder(Built using Actionscript classes) to convert
MXML ---> Actionscript ---> Bytecodes---> SWF which will be run by flash player.

Flex is used for application building. Thats for application developers.

MXML is an markup language .. and uses AS3 for handling events.

okie friends lets start learning flex2.0, its time for some basics...


Download Flex2 SDK

There is some nice video tuts for basic..gear up guys

Video Tutorials
Read more
4

Attach MovieClip in AS3:


In Actionscript 3.0 attachMovie(); function does not exist, but there
are some ways new ways to do that...

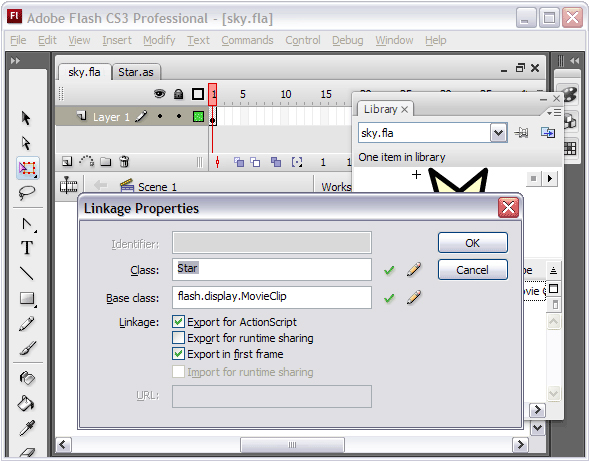
Create a movieClip in the IDE.. (name: Star)

Open library (ctrl+L)..and click linkage..

Select Export for ActionScript..(Note: We can give Any name in the identifier that is the linkage name)


Open Actions panel

Code follows:

var mc:Star=new Star();
mc.x=100;
mc.y=100;
addChild(mc);

Where Star is the linkage name..and its important to add it in the displaylist
Read more
13

Embedding Font in Flash CS3(using AS3)


Here is the way to embed fonts in AS3.0, and the code explanation follows

import flash.text.*;
var font:Font1=new Font1();
var txt_fmt:TextFormat=new TextFormat();
txt_fmt.font=font.fontName;
txt_fmt.size=24
var txt:TextField=new TextField();
txt.autoSize=TextFieldAutoSize.LEFT;
txt.defaultTextFormat=txt_fmt;
txt.embedFonts=true
txt.text="sara"
txt.selectable=false
addChild(txt);


Code Explanation:

Importing all the necessary classes..
import flash.text.*;

Creating new instance of the font from library..
var font:Font1=new Font1();
Here Font1 is the Linkage name given in the library


Creating TextFormat
var txt_fmt:TextFormat=new TextFormat();
txt_fmt.font=font.fontName;
txt_fmt.size=24

Note:
font is the instance name of Linkage name

Creating text field and applying the TextFormat created above
var txt:TextField=new TextField();
txt.autoSize=TextFieldAutoSize.LEFT;
txt.defaultTextFormat=txt_fmt;
txt.embedFonts=true
txt.text="sara"
txt.selectable=false

Adding the TextField to the DisplayList
addChild(txt);
Read more
0

Flash supported Firefox plugins


FlashTracer 2.0.0 :

While running any .swf Flash file in your browser you can see all the output generated by the "trace" flash functions in this sidebar component...

While running any .swf Flash file in your browser you can see all the output generated by the "trace" flash functions in this sidebar component.
You *NEED* the flash player debug version to run this extension correctly:
http://download.macromedia.com/pub/flashplayer/updaters/9/flashplayer_9_plugin_debug.exe

Works with:
Firefox: 2.0a1 – 2.0.0.*

Download

Flash Switcher (win)

Switch between various flash plugins or remove current plugin. It is installed in the statusbar of your browser. when you click on it a popup menu appears showing different options: which flash player version to install (2,3,4,5,6,7,8,9) or if you...

Switch between various flash plugins or remove current plugin. It is installed in the statusbar of your browser. when you click on it a popup menu appears showing different options: which flash player version to install (2,3,4,5,6,7,8,9) or if you want to remove the currently installed one.

Download
Read more
4

Handling Mouse Events for Planes(Papervision 3d)


Here contains the code for handling mouse events in papervision 3d using flash cs3..

Code contains explanations ..

// import the necessary files..
import org.papervision3d.scenes.*;
import org.papervision3d.cameras.*;
import org.papervision3d.objects.*;
import org.papervision3d.materials.*;
//dictionary objects holds objects as key
var planebycontainer:Dictionary=new Dictionary();
var container:MovieClip=new MovieClip();
container.x=stage.stageWidth*0.5;
container.y=stage.stageHeight*0.5;
addChild(container);
this.frameRate=40;
//creating scene basic for papervision; among multiple scenes Scene3D is basic one
var scene:Scene3D=new MovieScene3D(container);
//camera to see objects
var camera:Camera3D=new Camera3D();
//initial camera zoom is (0,0,0);
//to zoom object into scene..
camera.zoom=10;
//star making planes...
//create material-by attaching bitmap using BitmapAssetMaterial
var bam:BitmapAssetMaterial=new BitmapAssetMaterial("FlashIcon");
//by default material applied to one side of object(here plane);
bam.oneSide=false;
bam.smooth=true;
for (var i:int=0; i<5; i++) {
//new Plane(material,height, width,triangle num,triangle num)---triangle num to control quality
var p:Plane=new Plane(bam,150,75,2,2);

p.x=50*i;//gives value from -500 to 500
p.y=40;
p.z=40*i;
//p.y=Math.random()*1000-500;
//p.z=Math.random()*1000-500;
//p.x=500
p.rotationY=45;//rotate individual
//p.addEventListener(MouseEvent.CLICK,clicker);
scene.addChild(p);
var container2:Sprite = p.container;
//here we have container as key and plane as value later we retrive plane by using container
planebycontainer[container2]=p
container2.buttonMode = true;
//adding event listeners for mouse events
container2.addEventListener( MouseEvent.ROLL_OVER, doRollOver );
container2.addEventListener( MouseEvent.CLICK, clicker );
container2.addEventListener( MouseEvent.ROLL_OUT, doRollOut );
}
scene.renderCamera(camera);


this.addEventListener(Event.ENTER_FRAME,render);
function render(e:Event) {
//render places object in scene
scene.renderCamera(camera);
}
function doRollOver(evt:MouseEvent) {
var sprit:Sprite=evt.target as Sprite;
sprit.alpha = 0.5;
}
function doRollOut(evt:MouseEvent) {
var sprit:Sprite=evt.target as Sprite;
sprit.alpha = 1;
}
function clicker(evt:MouseEvent) {
//here we retrieve the plane which is clicked
var sprit:Sprite=evt.target as Sprite;
var p:Plane=planebycontainer[sprit]
trace(p)
}


Basic papervision example
Read more
2

Loading Library Assets from Loaded swf:


To load Movieclip from library in AS3:
var Content_mc:MovieClip= new MovieClip()

where Content_mc is the linkage name similarly to load content from loaded swf

var Content_mc:Class = event.target.applicationDomain.getDefinition(”Content_mc”) as Class
var new_content_mc:MovieClip = new Content_mc() as MovieClip;
addChild(new_content_mc);

Note : place this code in Complete Event ie., after preloading
Read more
4

3D rotation of Images using FlashCS3:


Step1: Download Papervision3D_1_5.zip Papervision3D Class Packages - Rev 1.5


Step2: OPen new document: CTRL+N or file open new

Step3: Save files in PV3D_1_5\src folder

Step4: Paste code in first frame of action panel

// import the necessary files..
import org.papervision3d.scenes.*;
import org.papervision3d.cameras.*;
import org.papervision3d.objects.*;
import org.papervision3d.materials.*;
var container:Sprite=new Sprite();
container.x=stage.stageWidth*0.5;
container.y=stage.stageHeight*0.5;
addChild(container);
this.frameRate=40;
//creating scene basic for papervision; among multiple scenes Scene3D is basic one
var scene:Scene3D=new Scene3D(container);
//camera to see objects
var camera:Camera3D=new Camera3D();
//initial camera zoom is (0,0,0);
//to zoom object into scene..
camera.zoom=5;
//star making planes...
//create material-by attaching bitmap using BitmapAssetMaterial
var bam:BitmapAssetMaterial=new BitmapAssetMaterial("FlashIcon");
//by default material applied to one side of object(here plane);
bam.oneSide=false;
bam.smooth=true;
for (var i:int=0; i<50; i++) {
//new Plane(material,height, width,triangle num,triangle num)---triangle num to control quality
var p:Plane=new Plane(bam,250,150,2,2);
scene.addChild(p);
p.x=Math.random()*1000-500;//gives value from -500 to 500
p.y=Math.random()*1000-500;
p.z=Math.random()*1000-500;
p.rotationY=Math.random()*360;//rotate individual

}
this.addEventListener(Event.ENTER_FRAME,render);
function render(e:Event) {
camera.x+=stage.mouseX-(stage.stageWidth*0.5);
//p.rotationY+=2
camera.y+=stage.mouseY-(stage.stageHeight*0.5);
//to render camera.. to view scene
scene.renderCamera(camera);
}


Note: Code contains explanations..

Important please add an image in stage and give a linkage name for that here we used FlashIcon


SourceFile here
Read more
0

External Interface(flash8):


External Interface(flash8):

Important thing when using external interface in flash to communicate with javascrpt is to..
add allowScriptAccess Parameter in html

To check in local: allowScriptAccess="Always"
To check while hosting: allowScriptAccess="sameDomain"

In MAC OS...Some time external interface will not work local..Host that files to server to work.....
Read more
0

Login to Administrator


Login to Administrator :
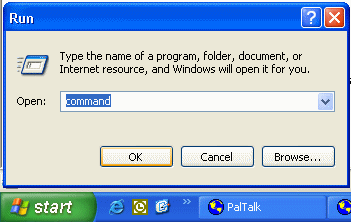
Step1: Start-->Run ,type cmd or command


Step2: Type the following in command prompt: at

Step3: Result will be "There are no entries in the list."

Step4: Type the following in command prompt: at 15:43 interactive/ cmd.exe

Note: 15:43 is local system time in 24 hours format, replace with system time..
if your system time is 12.00 type 12.02

Step5: New Command window will be opened at that time..

Step6: In task manager remove explorer.exe

Note: Above step will close all the windows..

Step7: Then close the first opened command prompt.

Step8: Type the following in command prompt: explorer.exe

Step9: WOW you are in ADMIN window...
Read more
6

Iframe Virus:


Last week my system was affected by Mallicious Iframe in all html, php files...
I removed by following steps and posted here...

To remove Iframe virus in (HTML,PHP,ASP,..) files

step1: start->Run type "taskmgr" without quotes.

Step2: Use Task Manager to terminate the worm process (it may be called "spoclsv.exe").

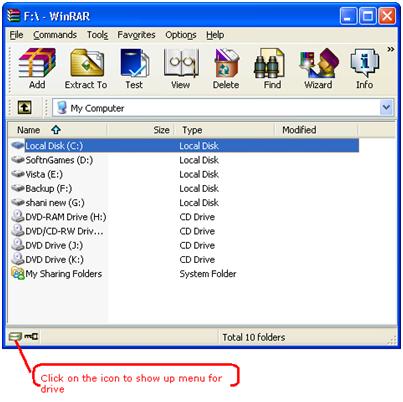
step3: open winrar.exe ...select drive icon in bottom-left corner select c:
there will be setup.exe and autorun.inf
delete this files...


step4: Repeat above step to delete virus in all drives ..

Note:Virus will be hidden and folder option to change hidden files will be corrupted..

step5: Delete the following parameters from the system registry .
[HKCU\Software\Microsoft\Windows\CurrentVersion\Run]
"Svcshare" = "%System%\drivers\spoclsv.exe"

[HKLM\Software\Microsoft\Windows\CurrentVersion\Run]
"Svcshare" = "%System%\drivers\spoclsv.exe"
Note:type "regedit" in Run utility..HKCU(HKEY_CURRENT_USER),HKLM(HKEY_LOCAL_MACHINE)

step6:
Delete the following file:
C:/WINDOWS/system32/drivers/spoclsv.exe

step7: Download and install Ravmon Removal.exe to restore settings


step8: Restart..and download and install Antivirus kaspersky trial..
Read more
3

Drawing Dynamic object in flash cs3:


Code:

import flash.display.Sprite;
import flash.events.Event;
var spr:Sprite=new Sprite();
spr.graphics.beginFill(0xFF00FF,1);
spr.graphics.drawRect(100,100,200,200);
spr.graphics.endFill()
spr.name="sara";
spr.addEventListener(MouseEvent.CLICK,sarafun);
addChild(spr)
function sarafun(event:MouseEvent){
trace(event.target.name);
}


Explanation:

Sprite:
Derived from DisplayObject Class..
Lightweight..
Similar to movieclip but contains single frame or no timeline..

var spr:Sprite=new Sprite();

this is to create dynamic sprite..

Note:Similar to create empty movleclip


spr.graphics.beginFill(0xFF00FF,1);
spr.graphics.drawRect(100,100,200,200);
spr.graphics.endFill()

here how to create drawing objects...
Many ways like drawCircle(),drawEllipse()..,

spr.addEventListener(MouseEvent.CLICK,sarafun);
here we are adding listener...to object...more like

Note:
onpress=onrelease=MouseEvent.CLICK
onmousedown=MouseEvent.MOUSE_DOWN
onmouseup=MouseEvent.MOUSE_UP
soon..

addChild(spr);
here we are adding sprite to the display list...

Note:there is no need to specify depth since it manages itself
Read more
2

Preloading in FlashCS3


Started learning flash CS3..so i sharing what i learnt...
this is to preloading in cs3...

full code:
import flash.display.Loader;
import flash.net.URLRequest;
var url:String='http://greetings.visualenc.com/shockwave/friends3.swf?cachebusters='+new Date().getTime();
var loader:Loader=new Loader();
loader.contentLoaderInfo.addEventListener(Event.OPEN,loadinit);
loader.contentLoaderInfo.addEventListener(ProgressEvent.PROGRESS,loading);
loader.contentLoaderInfo.addEventListener(Event.COMPLETE,completes);
loader.load(new URLRequest(url))
addChild(loader)
function loadinit(event:Event){
trace("::::Started::::");
}
function loading(event:ProgressEvent) {
trace((event.bytesLoaded/event.bytesTotal)*100);
}
function completes(event:Event){
trace("::::complete::::")
}


import flash.display.Loader;
import flash.net.URLRequest;

This is loading the necessary packages...for loader class and url request


var url:String='http://greetings.visualenc.com/shockwave/friends3.swf?cachebusters='+new Date().getTime();

string contains the url to be loaded..

that new Date().getTime()..is not new feature. when added to url files will not be cached...or no need to clear cache for new updated file..


var loader:Loader=new Loader();
Creating Object for loader class...Loader class is to load image and swf files into flashCS3


loader.contentLoaderInfo.addEventListener(Event.OPEN,loadinit);
loader.contentLoaderInfo.addEventListener(ProgressEvent.PROGRESS,loading);
loader.contentLoaderInfo.addEventListener(Event.COMPLETE,completes);

Adding listeners ..similar to MovieClipLoader in flash8.


loader.load(new URLRequest(url))

loading external content into loader object via url request class...


trace((event.bytesLoaded/event.bytesTotal)*100);

here we calculate the bytes loaded...
Read more
0

Silverlight


Microsoft® Silverlight™ is a cross-browser, cross-platform plug-in for delivering the next generation of .NET based media experiences and rich interactive applications for the Web. Silverlight offers a flexible programming model that supports AJAX, VB, C#, Python, and Ruby, and integrates with existing Web applications. Silverlight supports fast, cost-effective delivery of high-quality video to all major browsers running on the Mac OS or Windows.

  • Deliver media experiences and rich interactive applications (RIAs) for the Web that incorporate video, animation, interactivity, and stunning user interfaces.

  • Seamless, fast installation for users, thanks to a small, on-demand, easy-to-install plug-in that is under 2 megabyte (MB) in size and works with all leading browsers.

  • Consistent experiences between Windows-based and Macintosh computers without any additional installation requirements.

  • Create richer, more compelling Web experiences that takegreater advantage of the client for increased performance.

  • Stunning vector-based graphics, media, text, animation,and overlays that enable seamless integration of graphics and effectsinto any existing Web application.

  • Enhance existing standards/AJAX-based applications with richergraphics and media, and improve their performance and capabilities byusing Silverlight.


Showcase

Download
Read more
0

Google phone is coming, believe it or not


People who have seen Google's prototype devices say they aren't as revolutionary as the iPhone. One was likened to a slim Nokia Corp. phone with a keyboard that slides out. Another phone format presented by Google looked more like a Treo or a BlackBerry.


It's not clear which manufacturers might build Google wireless devices, though people familiar with the project say LG Electronics Co. of South Korea is one company that has held talks with Google.


Google has already lined up a series of hardware component and software partners and signaled to carriers that it's open to various degrees of cooperation on their part, the people say.
Google has developed a prototype cell phone that could reach markets within a year, and plans to offer consumers free subscriptions by bundling advertisements with its search engine, e-mail and Web browser software applications, according to a story published today in The Wall Street Journal.

Google is showing the prototype to cell phone manufacturers and network operators as it continues to hone the technical specifications that will allow the phone to offer a better mobile Web browsing experience than current products, the story said.


The move would echo another recent product launched by a phone industry outsider, Apple Inc.’s iPhone. But Google’s product would draw its revenue from a sharply different source, relying on commercial advertising dollars instead of the sticker price of at least $499 for an iPhone and $60 per month for the AT&T service plan.


Negotiating the fairest way to split those advertising revenues with service providers could be a big hurdle for Google, one analyst said. Another problem is the potential that consumers could be scared off by the prospect of listening to advertisements before being able to make phone calls, said Jeff Kagan, a wireless and telecommunications industry analyst in Atlanta.
Read more
0

Spry framework for Ajax


The Spry framework for Ajax is a JavaScript library for web designers that provides functionality that allows designers to build pages that provide a richer experience for their users. It is designed to bring Ajax to the web design community who can benefit from Ajax, but are not well served by other frameworks.

The Spry framework is a way to use the data capabilities that enable designers to incorporate XML, JSON or HTML data into their documents using HTML, CSS, and a minimal amount of JavaScript, without the need for refreshing the entire page. The Spry framework is HTML-centric, and easy to implement for users with basic knowledge of HTML, CSS and JavaScript. The framework was designed such that the markup is simple and the JavaScript is minimal. The Spry framework can be used by anyone who is authoring for the web in their tool of choice.


This is the 6th pre-release of Spry. In this release, we are introducing many asked-for features in the data realm: Nested Data Sets, JSON Data Sets, HTML Data Sets, some new widgets and a reworking of Spry Effects.

This is just the start of the project. We're releasing a preview build now so that you have plenty of time to give us feedback on what's working for you, and what isn't. Your feedback and participation is important to us as we build out the framework.


Demo

Get Spry framework
Read more
2

The Flex Online Compiler


The Flex Online Compiler allows you to experience Flex 2 for yourself, without needing to download or install anything. Of course, you really should download Flex Builder 2 to truly get a feel for Flex, but until you do so, you may use The Flex Online Compiler to compile and run MXML and ActionScript code.


Simply type your code below, and click the Try It! button. Start with code of your own, or use the select boxes below to select Flex code that you can tweak and modify as you see fit. Enjoy!

More here..
Read more
1

Yahoo! Flash Blog


check out what’s new at the Flash Developer Center on the Yahoo Developer New library up for download that adds some cool user interface components to Flash CS3. You’ll find an AutoComplete component, a Menu, a Tree, a TabBar, and my personal favorite, four different Charting components. All free and available under the terms of terms of the BSD license.

Yahoo Flash Platform Team

Yahoo Flash Developer Center - A central source for open source code and libraries, articles, videos, all related to Flash development.

Astra Flash Components - As mentioned above, it’s a user interface component library for Flash CS3 developed by Yahoo.

There also updated the Astra Web APIs library with new documentation.


here to yahoo blog
Read more
3

Creating custom flash menu:


Step1: Open New document in flash (Ctrl + N)

Step2: Select first frame, right-click and paste the below code in first frame

code contains explanations

var con:ContextMenu = new ContextMenu();//The ContextMenu class provides runtime control over the items in the Flash Player context menu, which appears when a user right-clicks (Windows) or Control-clicks (Macintosh) on Flash Player.
con.hideBuiltInItems();//Hides all built-in menu items (except Settings) in the specified ContextMenu object
var new_menu:ContextMenuItem = new ContextMenuItem("sara_blog", fun);//creating new menu item-fun is the event handler called on click
con.customItems.push(new_menu);//adding the new item to context menu
function fun() {
getURL("http://sara-intop.blogspot.com/","_blank")//calling new url on click
}
_root.menu = con;//Associates the ContextMenu object con


your are done now run flash and right click
Read more
0

Hide Flash right-click menu:


Step1: Open New document in flash (Ctrl + N)

Step2: Select first frame, right-click and paste the below code in first frame


code contains explanations

var con:ContextMenu = new ContextMenu();//The ContextMenu class provides runtime control over the items in the Flash Player context menu, which appears when a user right-clicks (Windows) or Control-clicks (Macintosh) on Flash Player.
con.hideBuiltInItems();//Hides all built-in menu items (except Settings) in the specified ContextMenu object
_root.menu = con;//Associates the ContextMenu object con


your are done now run flash and right click
Read more
1

Creating Dynamic Div - Display error in form validation:


Sometimes we use alert user about wrong information supplied .. instead of using alert we can display information in document itself..

here is the full code and code explanation follows..

<html>
<head>
<style type="text/css">
#error
{
margin:0 auto;
background-color:#FFFFCC;
border:#FF822F 1px solid;
}
</style>
<script language="javascript">
function fun()
{
if(document.getElementById('frm1').txt1.value=="")
{
var div_element=document.getElementById('error_full');
var str_error="<div id=\"error\">Enter Valid Name:</div>";
div_element.innerHTML=str_error;
}
else{
var div_element=document.getElementById('error_full');
var str_error="<div id=\"error\">Hi "+document.getElementById('frm1').txt1.value+" !!</div>";
div_element.innerHTML=str_error;

}
}
</script>
</head>
<body>
<div id="error_full"></div>
<form action="" id="frm1">
<input type="text" name="txt1"/>
<input type="button" value="Hello world!" onclick="fun();"/>
</form>
</body>
</html>


Code explanation

Style:
Styles can be applied using id or class, use #infront of style if we use id...and .(dot) if we use class.
Here we use id.
We supplied background color, boder information in style sheet..
<style type="text/css">

#error
{
margin:0 auto;
background-color:#FFFFCC;
border:#FF822F 1px solid;
}
</style>

HTML:
DIV with id error_full is where we create dynamic div
Form tag with textfield and button.
Button calls javascript function fun onclick..

<body>
<div id="error_full"></div>
<form action="" id="frm1">
<input type="text" name="txt1"/>
<input type="button" value="Hello world!" onclick="fun();"/>
</form>
</body>

Javascript:
getElementById('frm1') returns the element which has the id supplied as argument.
innerHTML=returns or writes the elements or text enclosed in the div

<script language="javascript">
function fun()
{
if(document.getElementById('frm1').txt1.value=="")
{
var div_element=document.getElementById('error_full');
var str_error="<div id=\"error\">Enter Valid Name:</div>";
div_element.innerHTML=str_error;
}
else{
var div_element=document.getElementById('error_full');
var str_error="<div id=\"error\">Hi "+document.getElementById('frm1').txt1.value+" !!</div>";
div_element.innerHTML=str_error;

}
}
</script>
Read more
0

Free photoshop brushes


Photoshop brushes are easy way to create amazing artistic effects , some of the free brushes are there ..., i found some useful brushes and the links are here


more...
more...
Read more
0

Photoshop shortcuts


Photoshop shotcuts may be useful to make you peoples great designer and i found these photoshop shortcuts ...


  • Press Tab will hide tool bar and palette, Shift+Tab will hide only palette.

  • Hold Shift + click the top blue bar for toolbar and palette will move them to the nearest edge.
  • Double click the top blue bar, on any palette window, to minimize it.

  • Double click the gray background will bring up open file option, Hold Shift+double click will open up the browser.

  • Sick of the default gray background around your image? Select paint bucket, hold shift and click on the gray background, it will change to whatever color you have in your foreground color box.

  • In Photoshop, all "Cancel" buttons in a window can be changed to a "Reset" button by holding Alt.

  • Caps lock will switch your cursor for accuracy.

  • Press F button, it will switch between 3 different screen modes and give you more working area.


  • To draw a straight line, click then move to the end point and hold shift + click.

  • Hold Ctrl will temporary make any tool into move tool until you release Ctrl.

  • Ctrl + Alt and click drag the image, it will make a duplication of the current image over lay on top.

  • Hold Space bar, it will make any tool into "Hand Tool" until you release Space bar.

  • While in Zoom Tool, Ctrl+space = zoom in, alt+space = zoom out.

  • Hold Ctrl and press "+" or "-" it will change the % for image in navigator window.

  • When Using eyedropper tool to capture foreground color, hold Alt and click, it will instantly capture the color for background.

  • With Measure Tool, draw a line then hold Alt and draw another line from the end of the first line, it will measure the angle.

  • Ctrl+Alt+Z and Ctrl+Shift+Z will go back and forth in the history.

  • Alt+Backspace and Ctrl+Backspace will fill in the whole screen with foreground color or background color, Shift+backspace will bring up option window, Alt+Shift+Backspace and Ctrl+Shift+Backspace, will fill the image with foreground or background color but will leave the alpha transparent area alone.

  • When free transforming with Ctrl+T, hold Alt to keep the original image and then to transform a duplicated layer of it. Ctrl+Shift+T to repeat whatever you did in the last transform.

  • To make sure your Crop is on the edge of the image, hold Ctrl while cropping.

  • Ctrl+J will duplicate the current layer.

  • Ctrl+Shift+E will merge all visible layers to one layer, Ctrl+Shift+Alt+E will make a copy of the original and merge all visible layers.

  • While using Marquee Tools, hold Alt it will make the starting point as a center of the selection.

  • Ctrl + D to deselect, Ctrl+Shift+D to reselect what you deselected.

  • Hold Alt while clicking on the eye icon beside the layer, it will hide all other layers.

  • Hold Alt while clicking the pen icon beside the layer, it will unchain this layer from all layers.

  • Select a layer, hold Alt and click the top edge of another layer, it will group them.

  • Hold Alt and click the button "Create a new layer", it will create a new adjustment layer.

  • Select a layer and hold Alt, then click on the garbage can button. It will instantly delete the layer, marquee where you want alpha and Ctrl+click the "Create new channel" button, it will create an alpha only on the area you marquee.

  • Ctrl+Tab allows you to switch between different image files you are working on.

  • F12 = Revert to how the file was the last time you saved it.
Read more
0

Loader animation


HI friends,


i found a site contains app to generate loading animated gifs that can be more useful to you peoples


more here
Read more
1

Dynamic Image gallery(Fade_In_Out):


This is simple dynamic gallery to Fade in out images...

Note: Using flash8.....


Step1: Open New document in flash (Ctrl + N)


Step2: Select first frame, right-click and paste the below code in first frame

code contains explanations


//importing tween classes
import mx.transitions.Tween;
import mx.transitions.easing.*;
//variables declaration------>
var delay:Number = 5000;//interval between tweens
//array containing image urls
var data_arr:Array = ["http://imagecache2.allposters.com/images/pic/NIM/AF605~Flowers-and-Butterflies-Posters.jpg", "http://www.global-b2b-network.com/direct/dbimage/50322257/Sun_Flowers.jpg", "http://img.alibaba.com/photo/50637711/Simulated_Silk_Luau_Leis__Hibiscus_Flowers.jpg", "http://www.highlandcountryweddings.co.uk/flowers1.jpg"];
var current_num:Number = 0;
var first_num:Number = 0;
_root.createEmptyMovieClip("image_holder", _root.getNextHighestDepth());//empty Movieclip
_root.image_holder._x = 0;
_root.image_holder._y = 0;
//moviecliploader class
var mcl_lis:Object = new Object();
var mcl:MovieClipLoader = new MovieClipLoader();//moviecliploader class to load external files
mcl.addListener(mcl_lis);//adding listener to moviecliploader class
//calling the function for firsttime
load_image();
//
function load_image() {
mcl.loadClip(_root.data_arr[_root.current_num], _root.image_holder);//loading image in the holder
//looping the array values
if (_root.current_num>=data_arr.length-1) {
_root.current_num = _root.first_num;
} else {
_root.current_num++;
}
}
//load init function called when image start loading
mcl_lis.onLoadInit = function(target_mc:MovieClip) {
var obj:Tween = new Tween(target_mc, "_alpha", Normal.easeIn, 0, 100, .8, true);
//timer function to hold tween for some secs
var timer = getTimer();
_root.interval = setInterval(function () {
if ((getTimer()-timer)>delay) {
var obj:Tween = new Tween(target_mc, "_alpha", Normal.easeIn, 100, 0, .8, true);//Tween alpha of Mc from 100 to 0 in duration .8 seconds
obj.onMotionFinished = function() {
load_image();//loading next image from array
};
clearInterval(_root.interval);
}
}, 30);
};
Read more
1

Tweening Filters in flash:


After completing this tutiorial you can learn using MovieclipLoader class, and Tweening flash filters..

Note :Requiremet for this tut is Macromedia Flash8

Step1: Open New document in flash (Ctrl + N)

Step2: Select first frame, right-click and paste the below code in first frame

code contains explanations

import flash.filters.*;//importing all the filter class files
import mx.transitions.Tween;//importing all the tween class files
import mx.transitions.easing.*;
_root.createEmptyMovieClip("imageHolder", _root.getNextHighestDepth());//creating runtime movieclip to hold image
System.security.allowDomain("http://emiliewood.com/photos/july2005/17-july-05-flowers.jpg");//allowing flash to load files from other domain
//creating listerner object for movieclip loader class
var mcl_lis:Object = new Object();
//movieclip loader class to load external files
var mcl:MovieClipLoader = new MovieClipLoader();
//adding listener to moviecliploader class
mcl.addListener(mcl_lis);
//loading image file using moviecliploader class
mcl.loadClip("http://emiliewood.com/photos/july2005/17-july-05-flowers.jpg", _root.imageHolder);
//onloadinit function called once image loaded
mcl_lis.onLoadInit = function(target_mc:MovieClip) {
//tweening blur filter 5 -0 in 2 secs-- and applying dropshawdow using tween class
var myTween:Tween = new Tween(target_mc, "blur", Strong.easeInOut, 5, 0, 2, true);
myTween.onMotionChanged = function() {
target_mc.filters = [new BlurFilter(target_mc.blur, target_mc.blur, 1), new DropShadowFilter(1, 90, 0x000000, .8, 1, 1, 1, 1)];
};
};
Read more
3

FadeInOut text animation In ActionSctipt:


From this script you can learn how to use Tween class, Interval, Font embed,...


Step1: Open New document in flash (Ctrl + N)

Step2: Embed Font in flash

Open the Library panel (Ctrl+L).

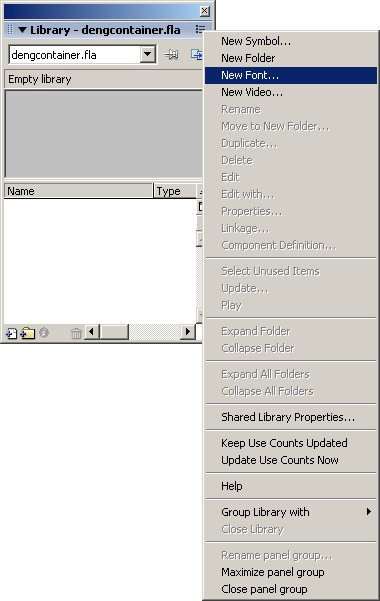
Add a font to your library

Click the options menu in the upper right corner of the panel(just below close button)


Select New Font from the menu.

In the Font Symbol Properties dialog box select the font, size and style that you want and give the font combination a name.

Click OK to close the dialog box.

Right-click the font symbol in the library and select Linkage from the contextual menu.

In the Linkage Properties dialog box, click the Export for ActionScript button to enable both the Identifier and AS 2.0 Class text input fields.


Leave the default Identifier value and click OK to close the dialog box.

Note: Identifier value is used in actionscript

Step3: Identifier value used in this tut is myfont

Step4: Select first frame, right-click and paste the below code in first frame

code contains explanations


//importing tween classes
import mx.transitions.Tween;
import mx.transitions.easing.*;
//variables declaration------>
var delay:Number = 5000;//interval between tweens
var data_arr:Array = ["sara", "muzu", "asan", "ramesh", "prasath", "kalis", "babu", "mathan"];
var current_num:Number = 0;
var first_num:Number = 0;
//text_format ------------>
var txt_fmt:TextFormat = new TextFormat();
with (txt_fmt) {
font = "myfont";//identifier used in font embed
size = 20;//font size
color = "0x000000";//font color
}
_root.createEmptyMovieClip("text_holder", _root.getNextHighestDepth());//empty Movieclip
_root.text_holder.createTextField("txt1", _root.text_holder.getNextHighestDepth(), 0, 0, 0, 0);//textfield
_root.text_holder._x = 100;
_root.text_holder._y = 100;
load_data();


//load data function sets text and apply text format
function load_data() {
_root.text_holder.txt1.embedFonts = true;
_root.text_holder.txt1.autoSize = "left";
_root.text_holder.txt1.text = _root.data_arr[_root.current_num];
_root.text_holder.txt1.setTextFormat(txt_fmt);
var obj:Tween = new Tween(_root.text_holder, "_alpha", Normal.easeIn, 0, 100, .8, true);//Tween alpha of Mc from 0 to 100 in duration .8 seconds
obj.onMotionFinished = function() {
transition();
};
//checking the lenght of the array to loop
if (_root.current_num>=data_arr.length-1) {
_root.current_num = _root.first_num;
} else {
_root.current_num++;
}
}

//function transition hold the tween for 5 seconds
function transition() {
var timer = getTimer();
_root.interval = setInterval(function () {
if ((getTimer()-timer)>delay) {
var obj:Tween = new Tween(_root.text_holder, "_alpha", Normal.easeIn, 100, 0, .8, true);//Tween alpha of Mc from 100 to 0 in duration .8 seconds
obj.onMotionFinished = function() {
load_data();//loading next data from array
};
clearInterval(_root.interval);
}
}, 30);
}
Read more
5

Resize image Dynamically(proportionally) in flash as2/as3


1)Open new document in flash(ctrl+N)

2)Select first frame, right-click and paste the below code in first frame

3)Code contains explanations commented
//variable declarations to hold the values
var thisWidth:Number;
var thisHeight:Number;
var maximumHeight:Number;//height to which movieclip to be resized
var maximumWidth:Number;//width to which movieclip to be resized
var oldx:Number;
var oldy:Number;
var ratio:Number;
var mclis:Object = new Object();//An object that listens for a callback notification from the MovieClipLoader event handlers.


mclis.onLoadInit = function(target_mc:MovieClip) {//Invoked when the actions on the first frame of the loaded clip have been executed
_root.thisHeight = target_mc._height;//loaded movieclip height
_root.maximumHeight = 100;
_root.thisWidth = target_mc._width;//loaded movieclip width
_root.maximumWidth = 100;
ratio = thisHeight/thisWidth;//calculation ratio to which resize takes place

if (thisWidth>maximumWidth) {
thisWidth = maximumWidth;
thisHeight = Math.round(thisWidth*ratio);
}
if (thisHeight>maximumHeight) {
thisHeight = maximumHeight;
thisWidth = Math.round(thisHeight/ratio);
}
target_mc._width = thisWidth;//applying new width
target_mc._height = thisHeight;//applying new height
target_mc._x = 10;
target_mc._y = 10;
};
var mcl:MovieClipLoader = new MovieClipLoader();//MovieClipLoader class lets you implement listener callbacks that provide status information while SWF, JPEG, GIF, and PNG files are being loaded into movie clips.
mcl.addListener(mclis);//add the object as listener for event handlers
_root.createEmptyMovieClip("holder_mc", _root.getNextHighestDepth());//holder movieclip
_root.mcl.loadClip("http://www.atpm.com/11.02/nature/images/blue-flower.jpg", _root.holder_mc);//You can use the loadClip() method to load one or more files into a single movie clip or level;


__________________________________________________________________

Actionscript3.0

Resize.as
************

/**Do not delete the lines below
* @author: Saravanan
* @url: http://www.sara-intop.blogspot.com.com
* ---------------------------------------------------------------------
* @usage: Resize the assets dynamically
* ---------------------------------------------------------------------
*/
package com.classes{
import flash.display.MovieClip;
public class Resize extends MovieClip {
/*Constant variables-----------*/
/*Private variables-----------*/
private var _thisWidth:Number;
private var _thisHeight:Number;
private var _maximumHeight:Number;
private var _maximumWidth:Number;
private var _ratio:Number;
/*Public variables-----------*/
public var __height:int;
public var __width:int;

/**
* Constructor Function Resize
* Calculating the Height and Width from input values against Maximum height and Width
* @param thisWidth representing orginal height of the Object
* @param thisHeight representing orginal width of the Object
* @param maximumHeight||maximumWidth is the bound of the result
*/
public function Resize(thisWidth:int,thisHeight:int,maximumHeight:int,maximumWidth:int) {
this._thisWidth = thisWidth;
this._thisHeight = thisHeight;
this._maximumHeight = maximumHeight;
this._maximumWidth = maximumWidth;
this._ratio = this._thisHeight/ this._thisWidth;
calculate()
}
private function calculate() {

if ( this._thisWidth>this._maximumWidth) {
this._thisWidth = this._maximumWidth;
this._thisHeight = Math.round( this._thisWidth*this._ratio);
}
if ( this._thisHeight>this._maximumHeight) {
this._thisHeight = this._maximumHeight;
this._thisWidth = Math.round(this._thisHeight/this._ratio);
}
this.__height=this._thisHeight;
this.__width=this._thisWidth;
}
}
}


Usage

import com.classes.Resize;
var _resize:Resize=new Resize(_material_mc.width,_material_mc.height,300,200);


access the result height and width by
_resize.__width
_resize.__height


Related posts

Preloading in FlashCS3

3D rotation of Images using FlashCS3:
Read more
6

Color picker in flash:


Step1:
Save the color spectrum image to local disk


Step2:
Import into flash (ctrl+r) or File-import-import to stage..

Step3:
select image and convert to symbol (ctrl+F8) or Modify--conver to symbol.. Name it as spectrum

Step4:
Select the Movieclip in Stage and name it as img_mc in the property window

Step5:
Draw rectangle using rectagle tool and convert to symbol, name it as rect

Step6:
Select the Movieclip rect in Stage and name it as target_mc in the property window

Step7:
Place the code below in the first frame..(right-click firstframe--select actions-paste the code in actions panel)


import flash.display.*;//Bitmap data class contained in display package
import flash.geom.*;//colorTransform contained in geom package
var image_bitmap = new BitmapData(img_mc._width, img_mc._height);//The BitmapData object to draw.
image_bitmap.draw(img_mc);//Draws a source image or movie clip onto a destination image
onMouseMove = function () {
if (img_mc.hitTest(_xmouse, _ymouse, true)) {//on moving mouse over movieclip
var curr_color:Number = image_bitmap.getPixel(img_mc._xmouse, img_mc._ymouse);//Returns an integer that reresents an RGB pixel value from a BitmapData object at a specific point (x, y).
var preview_colortansform = new ColorTransform();//The ColorTransform class lets you mathematically adjust all of the color values in a movie clip
preview_colortansform.rgb = curr_color;//The RGB color value for a ColorTransform object
target_mc.transform.colorTransform = preview_colortansform;
trace(curr_color.toString(16));//returning string value
}
};

Step8:
The color picker for your project........!
Read more
2

Free ring tones for iphone


Create iPhone ringtones from iTunes previews:

1. Create a new playlist. Drag unpurchased songs from the iTunes store into your playlist. The songs will retain their "Add Song" buttons and their price within the playlist.

2. Export your playlist. Select the playlist in the sources column. Control-click/Right-click the playlist name and choose Export Song List from the pop-up menu.

3. Save the playlist as plain text. Select Plain Text from the Format pop-up and save the playlist file to your desktop.

4. Open the playlist file. It is a tab-delimited file of columns, so you can open it up in Excel (my preference, make sure to option-drag the text file onto the Excel icon) or a text editor like TextEdit.


5. Locate the file URLs. Each file URL appears in the final Location column for each line. Copy the URL.

6. Download the files. In Safari 3.0, open the Downloads window (Windows->Downloads). Paste the URL into the Download window and allow the file to transfer. Your computer must be authorized to your iTunes account. You may want to try playing back the file in QuickTime Player just to be sure it downloaded correctly. If you're not a Safari 3.0 user, use your favorite alternate such as curl, wget, or so forth.

7. Rename. Give the file a more meaningful name than, for example, "mzi.rwgtaash.aac.p.m4p". Retain the .m4p extension.

8. Upload to the iPhone. Use your favorite method (iphoneinterface, sshfs, sftp, whatever) to copy the file to /Library/Ringtones on your iPhone.

9. Select the ringtone. On the iPhone, navigate to Settings -> Sound > Ringtone and select the new file. The ringtone will play back as you select it. Please note that some newer releases (including Nicole Scherzinger's Whatever U Like--thanks Drunk Dwarf) do not work as ringtones. I'm not sure why.

Congratulations, not only have you added a new 30-second custom ringtone to your iPhone, but iTunes usually picks the best 30 seconds of any song for its preview. Enjoy.


Article source:http://www.tuaw.com/2007/07/27/create-iphone-ringtones-from-itunes-previews/
Read more
0

Places to See in Chennai


Sri Kapaleeswarar Temple : Not far from Triplicane, in Mylapore, there is yet another 8th century Pallava temple. The temple 'Gopuram'(tower) is characteristic of Dravidian style architecture .Dedicated to Lord Shiva,this temple has some beautiful sculptures,among which the bronze idols of 63 Saivite Saints(Nayanmars) which adorn the outer coutyard are rare specimens.

Guindy National Park : Once this was all part of Governor's Estate. Now it is fragmented and the major part is a thickly forested game sanctuary where the spotted deer and the black buck roam about and a wealth of smaller fauna thrive. This is the country's only Wild Life Sanctuary within a city's limits.


Fort ST. George : Fort St. George occupies a place of pride and prominence in Chennai. It was built in 1640 AD, by the British East India Company under the direct supervision of Francis Day and Andrew Cogon. This bastion achieved name from St. George, the patron saint of England. The fort houses St. Mary's Church and fort museum.

Government Museum Complex : Once British Society in Chennai used to meet in the Pantheon. Its 18th century buildings and grounds have over the years since then been developed into the Connemara Library, one of the country's three National Libraries, the national Art Gallery, a beautiful building of Jaipur- Mughal architecture.

Valluvar Kottam : The memorial to the poet-saint Tiruvalluvar is shaped like a temple chariot and is, in fact, the replica of the temple chariot in Thiruvarur. A life-size statue of the saint has been installed in the chariot which is 33m. tall. The 133 chapters of his famous work Thirukkural have been depicted in bas-relief in the front hall corridors of the chariot.


Birla Planetarium : The Birla Planetarium at Kotturpuram, between Adyar and Guindy, is the most modern planetarium in the country. Adjoining the planetarium is a Periyar Science and Technology Museum which will be of interest to students and other science scholars.

The Marina : Stretching two miles, from the Coovum River's mouth, south of the Fort, till the northern boundaries of the 16th century Portuguese town of San Thome, is this magnificent beach drive and promenade. At the southern end of the Marina is the San Thome basilica, built in 1896.
Read more
1

Storing values from external XML file into Array using flash:


Step1: Create new flash document

Step2: Right-click first frame and select actions

Step3: Paste the below code in first frame

var xm:XML = new XML();//creating XML object
var name_arr:Array=new Array()//array objects to hold name data from xml
var age_arr:Array=new Array()//array objects to hold age data from xml
xm.ignoreWhite = true;//white spaces will be discarded


xm.onLoad = function() {//function will be call when xml file data loaded into xml object
var full_arr:Array=this.firstChild.childNodes//here we have array of child nodes
var len:Number=full_arr.length-1//getting the no of child nodes
for(var i:Number=0;i<=len;i++)//looping trough the values
{
name_arr[i]=full_arr[i].childNodes[0].firstChild//storing name values in array
age_arr[i]=full_arr[i].childNodes[1].firstChild //storing age details in array
trace([name_arr[i],age_arr[i],newline]);

}

};


xm.load("sample.xml");//loading the xml file data into xml object


Step4: save the file as example.fla

Step5: Create xml file (may be notepad and change extension from .txt to .xml)

Step6: Paste the below data in XML

<?xml version="1.0"?>
<root>
<student><name>sara</name><age>23</age></student>
<student><name>manju</name><age>25</age></student>
<student><name>sind</name><age>23</age></student>
</root>

Step7: Save under the same path where flash file is (file name: sample.xml)

Note: name of the xml file and path is more important
Read more
0

Getting values from external XML file into flash:


Step1: Create new flash document

Step2: Right-click first frame and select actions

Step3: Paste the below code in first frame

var xm:XML = new XML();//creating XML object
xm.ignoreWhite = true;//white spaces will be discarded
xm.onLoad = function() {//function will be call when xml file data loaded into xml object
trace(this.firstChild)//indicates node and child nodes of it
trace("----------------------------------------------------------");
trace(this.firstChild.childNodes[0])//displays the child nodes of the first child alone(under node)
trace("----------------------------------------------------------");
trace(this.firstChild.childNodes[0].childNodes[0])//displays the child nodes of the alone
trace("----------------------------------------------------------");
trace(this.firstChild.childNodes[0].childNodes[0].firstChild)//displays the nodevalue of the alone

};
xm.load("sample.xml");//loading the xml file data into xml object

Step4: save the file as example.fla

Step5: Create xml file (may be notepad and change extension from .txt to .xml)

Step6: Paste the below data in XML

<?xml version="1.0"?>
<root>
<student><name>sara</name><age>23</age></student>
<student><name>manju</name><age>25</age></student>
<student><name>sind</name><age>23</age></student>
</root>

Step7: Save under the same path where flash file is (file name: sample.xml)

Note: name of the xml file and path is more important
Read more
1

Loading external XML file into flash:


Step1: Create new flash document

Step2: Right-click first frame and select actions

Step3: Paste the below code in first frame

var xm:XML = new XML();//creating XML object
xm.ignoreWhite = true;//white spaces will be discarded
xm.onLoad = function() {//function will be call when xml file data loaded into xml object
trace(this)
};
xm.load("sample.xml");//loading the xml file data into xml object

Step4: save the file as example.fla

Step5: Create xml file (may be notepad and change extension from .txt to .xml)

Step6: Paste the below data in XML

<?xml version="1.0"?>
<root>
<student><name>sara</name><age>23</age></student>
<student><name>manju</name><age>25</age></student>
<student><name>sind</name><age>23</age></student>
</root>

Step7: Save under the same path where flash file is (file name: sample.xml)

Note: name of the xml file and path is more important
Read more
8

Delay Animation in Flash using AS:


step1: Animate a ball in stage for 30 frames

step2: Paste the below code and place it in first frame

function timer_fun(delayy:Number) {
this.stop();
var timer:Number = getTimer();
var inter:Number = setInterval(function () {

if (getTimer()-timer>delayy) {
trace("here");
clearInterval(inter);
play();
}
}, 10);
}

step3: Paste the below code in Frame where you want to pause for some sec's

timer_fun(1000);//call the function in frame where you want to pause
//1000--1sec
Read more
0

Actionscript Buttons


Step1: draw a rectangle using rectangle tool

step2: convert to button (select the rectangle and press F8) or Modify-->Convert to symbol

step3: Register point in center (optional)

step4: duplicate to five or more buttons by copy and paste

step5: name the buttons as num_mc1,num_mc2...num_mc4,num_mc5

step6: paste the code below in first frame


import mx.transitions.Tween;
import mx.transitions.easing.*;
var current_val:Number;
var old_val:Number;
for (i=1; i<=5; i++) {//change the number(5)--> to max buttons in stage
_root["num_mc"+i].num = i;
}
for (k=1; k<=5; k++) {//change the number(5)--> to max buttons in stage
_root["num_mc"+k].onRollOver = function() {
current_val = this.num;
if (current_val != old_val) {
var text_tween:Tween = new Tween(this, "_xscale", Normal.easeOut, 100, 150, .1, true);
var text_tween:Tween = new Tween(this, "_yscale", Normal.easeOut, 100, 150, .1, true);
}
};
_root["num_mc"+k].onRollOut = function() {
if (current_val != old_val) {
var text_tween:Tween = new Tween(this, "_xscale", Normal.easeOut, 150, 100, .1, true);
var text_tween:Tween = new Tween(this, "_yscale", Normal.easeOut, 150, 100, .1, true);
}
};
_root["num_mc"+k].onPress = function() {
_root.current_val = Number(this.num);
if (_root.current_val != _root.old_val) {
trace("you have selected button--"+_root.current_val);
var text_tween:Tween = new Tween(_root["num_mc"+old_val], "_xscale", Normal.easeOut, 150, 100, .1, true);
var text_tween2:Tween = new Tween(_root["num_mc"+old_val], "_yscale", Normal.easeOut, 150, 100, .1, true);
var scale_val:Number = _root["num_mc"+current_val]._xscale;
var text_tween3:Tween = new Tween(_root["num_mc"+current_val], "_xscale", Normal.easeOut, scale_val, 150, .1, true);
var text_tween4:Tween = new Tween(_root["num_mc"+current_val], "_yscale", Normal.easeOut, scale_val, 150, .1, true);
}
_root.old_val = Number(this.num);
};
//end on press
}


step7: press ctrl+enter
Read more
0

Passing XML to Flash from Html


step1: open new flash document

step2: paste the below code in first frame and dont run ..

var xm:XML = new XML();
xm.ignoreWhite = true;
xm.parseXML(str1);
_root.createEmptyMovieClip("text_holder", _root.getNextHighestDepth());
_root.text_holder._x = 100;
_root.text_holder._y = 100;
_root.text_holder.createTextField("txt1", _root.text_holder.getNextHighestDepth(), 0, 0, 0, 0);
_root.text_holder.txt1.autoSize = "left";
_root.text_holder.txt1.text = xm.firstChild.childNodes[0].childNodes[0].firstChild;

step3: save the flash movie (usingswf.fla)

step4: publish the flash movie (shift + F12) or (File->publish )

step5: html comment the object tag ()

step6: download the swfdeconcept ..here

step7: copy and paste the javascript file(swfobject.js) to the folder where html page is places

step8: paste below code next to commented object tag
<div id="flashcontent">
This text is replaced by the Flash movie.
</div>

<script type="text/javascript">
var str="<root>\n"+
"<author>\n"+
"<name>\n"+
"sara</name>\n"+
"</author>\n"+
"</root>";

var so = new SWFObject("usingswf.swf", "mymovie", "550", "400", "8", "#336699");
so.addVariable("variable1", str);

so.write("flashcontent");
</script>

step9: open the html document.....


my code

+++++++++html++++++++


<html xmlns="http://www.w3.org/1999/xhtml" xml:lang="en" lang="en">
<head>
<meta http-equiv="Content-Type" content="text/html; charset=iso-8859-1" />
<title>usingswf</title>
<script type="text/javascript" src="swfobject.js"></script>
</head>
<body bgcolor="#ffffff">
<!--url's used in the movie-->
<!--text used in the movie-->
<!-- saved from url=(0013)about:internet -->
<!--object classid="clsid:d27cdb6e-ae6d-11cf-96b8-444553540000" codebase="http://fpdownload.macromedia.com/pub/shockwave/cabs/flash/swflash.cab#version=8,0,0,0" width="550" height="400" id="usingswf" align="middle">
<param name="allowScriptAccess" value="sameDomain" />
<param name="movie" value="usingswf.swf" /><param name="quality" value="high" /><param name="bgcolor" value="#ffffff" /><embed src="usingswf.swf" quality="high" bgcolor="#ffffff" width="550" height="400" name="usingswf" align="middle" allowScriptAccess="sameDomain" type="application/x-shockwave-flash" pluginspage="http://www.macromedia.com/go/getflashplayer" />
</object-->


<div id="flashcontent">
This text is replaced by the Flash movie.
</div>

<script type="text/javascript">
var str="<root>\n"+
"<author>\n"+
"<name>\n"+
"sara</name>\n"+
"</author>\n"+
"</root>";

var so = new SWFObject("usingswf.swf", "mymovie", "550", "400", "8", "#336699");
so.addVariable("variable1", str);

so.write("flashcontent");
</script>
</body>
</html>


+++++++++Flash++++++++


var str1:String = unescape(_root.variable1);
var xm:XML = new XML();
xm.ignoreWhite = true;
xm.parseXML(str1);
_root.createEmptyMovieClip("text_holder", _root.getNextHighestDepth());
_root.text_holder._x = 100;
_root.text_holder._y = 100;
_root.text_holder.createTextField("txt1", _root.text_holder.getNextHighestDepth(), 0, 0, 0, 0);
_root.text_holder.txt1.autoSize = "left";
_root.text_holder.txt1.text = xm.firstChild.childNodes[0].childNodes[0].firstChild;


thanks to SWFDECONCEPT
Read more
0

Passing Value to Flash from Html:


step1: open new flash document

step2: paste the below code in first frame and dont run ..

trace("please run the html page");
getURL("javascript:alert("+_root.variable1+")");

step3: save the flash movie (usingswf.fla)

step4: publish the flash movie (shift + F12) or (File->publish )

step5: html comment the object tag ()

step6: download the swfdeconcept ..here

step7: copy and paste the javascript file(swfobject.js) to the folder where html page is places

step8: paste below code next to commented object tag

<script type="text/javascript" src="swfobject.js"></script>
<div id="flashcontent">
This text is replaced by the Flash movie.
</div>

<script type="text/javascript">
var str="hello";
var so = new SWFObject("usingswf.swf", "mymovie", "400", "200", "8", "#336699");
so.addVariable("variable1", "str");

so.write("flashcontent");
</script>

step9: open the html document.....alert message with hello


Note : if no alert ...please change the Version settings to flashplayer 7 and uncheck html in format tab

----------------------------------------------------
my code

+++++++++html++++++++


<head>
<meta http-equiv="Content-Type" content="text/html; charset=iso-8859-1" />
<title>usingswf</title>
<script type="text/javascript" src="swfobject.js"></script>
</head>
<body bgcolor="#ffffff">
<!--url's used in the movie-->
<!--text used in the movie-->
<!-- saved from url=(0013)about:internet -->
<!--object classid="clsid:d27cdb6e-ae6d-11cf-96b8-444553540000"

codebase="http://fpdownload.macromedia.com/pub/shockwave/cabs/flash/swflash.cab#version=8,0,0,0"

width="550" height="400" id="usingswf" align="middle">
<param name="allowScriptAccess" value="sameDomain" />
<param name="movie" value="usingswf.swf" /><param name="quality" value="high" /><param name="bgcolor"

value="#ffffff" /><embed src="usingswf.swf" quality="high" bgcolor="#ffffff" width="550" height="400"

name="usingswf" align="middle" allowScriptAccess="sameDomain" type="application/x-shockwave-flash"

pluginspage="http://www.macromedia.com/go/getflashplayer" />
</object-->


<div id="flashcontent">
This text is replaced by the Flash movie.
</div>

<script type="text/javascript">
var str="hello";
var so = new SWFObject("usingswf.swf", "mymovie", "400", "200", "8", "#336699");
so.addVariable("variable1", "str");

so.write("flashcontent");
</script>
</body>
</head>


+++++++++Flash++++++++

trace("please run the html page");
getURL("javascript:alert("+_root.variable1+")");


thanks to SWFDECONCEPT
Read more
5

Rain Effect in flash


Steps for rain effect in flash

1) create rain drop movieclip

2) Add linkage name by right_click symbol in library select linkage

3) In Linkage properties Dialog box select Export for actionscript check box and rename identifier: drop


4)slect first frame and press F9 Paste the below code in Action panel

var rain_speed:Number = 8;
var rain_direction:Number = 4;//negative values accepted
var rain_density:Number = 100;
_root.createEmptyMovieClip("rain_mc", _root.getNextHighestDepth());
for (i=0; i<=rain_density; i++) {
_root.rain_mc.attachMovie("drop", "drop"+i, _root.rain_mc.getNextHighestDepth(), {_x:Math.random()*Stage.width, _y:Math.random()*Stage.height, _rotation:-50});
}
var inter = setInterval(function () {
for (i=0; i<=rain_density; i++) {
_root.rain_mc["drop"+i]._y += rain_speed;
_root.rain_mc["drop"+i]._x += 5;
if (_root.rain_mc["drop"+i]._y>Stage.height) {
_root.rain_mc["drop"+i]._y = 0;
} else if (_root.rain_mc["drop"+i]._x>Stage.width) {
_root.rain_mc["drop"+i]._x = 0;
} else if (_root.rain_mc["drop"+i]._x<0) {
_root.rain_mc["drop"+i]._x = Stage.width;
}
}
}, 20)
Read more
0

SwapDepths in flash8


Steps to bring Movieclips to front:

1) have two moviclips named mc1, mc2


2)Paste the following code in the firstframe

mc1.onRollOver = function() {
this.swapDepths(_root.getNextHighestDepth());
};
mc2.onRollOver = function() {
this.swapDepths(_root.getNextHighestDepth());
};
Read more
0

Drawing Smooth curve from Flash


I got the sample from here and
http://www.strille.net/works/misc/followScriptedPath/followPath.html

and Modified to as type....

thanks fot the author.....

Smooth_path.as


class Smooth_path {
public var pathDetail:Number = .05;
public var drawPath:Boolean = true;
public function Smooth_path(myPath:MovieClip, line_data_arr:Array) {
trace("sdghafasjdgf"+[myPath, line_data_arr]);
// how smooth the path is, should not be much lower than 0.05, and must be > 0
//var myPath:MovieClip = _root.createEmptyMovieClip("myPath", _root.getNextHighestDepth());
Path(myPath);
// create a new path
for (var i:Number = 0; i<=line_data_arr.length-1; i++) { trace([line_data_arr[i].x, line_data_arr[i].y]); addPoint(myPath, line_data_arr[i].x, line_data_arr[i].y); } calcPath(myPath, pathDetail, drawPath); } private function Path(myPath:MovieClip) { myPath.x = []; myPath.y = []; myPath.numOfPoints = 0; myPath.subPointDis = null; myPath.subPointX = null; myPath.subPointY = null; myPath.subPointXl = null; myPath.subPointYl = null; myPath.totalDistance = 0; } private function addPoint(myPath:MovieClip, x, y) { myPath.x.push(x); myPath.y.push(y); myPath.numOfPoints++; } private function createContainers(myPath:MovieClip) { if (myPath.pathContainer == undefined) { if (_root["pathMC"] == undefined) { _root.createEmptyMovieClip("pathMC", _root.getNextHighestDepth()); } _root["pathMC"].createEmptyMovieClip("lineMC", _root.pathMC.getNextHighestDepth()); _root["pathMC"].createEmptyMovieClip("anchorMC", _root.pathMC.getNextHighestDepth()); myPath.pathContainer = _root["pathMC"].lineMC; myPath.anchorContainer = _root["pathMC"].anchorMC; } } private function calcPath(myPath:MovieClip, pathStepSize, drPath) { if (drPath) { trace(typeof (myPath)); createContainers(myPath); myPath.pathContainer.clear(); myPath.pathContainer.lineStyle(0, 0xcccccc, 100); //myPath.pathContainer.moveTo(myPath.x[0], myPath.y[0]); myPath.pathContainer._x = myPath.x[0]; myPath.pathContainer._y = myPath.y[0]; } else if (myPath.pathContainer) { myPath.pathContainer.removeMovieClip(); myPath.anchorContainer.removeMovieClip(); delete myPath.pathContainer; } myPath.subPointDis = [0]; myPath.subPointX = [myPath.x[0]]; myPath.subPointY = [myPath.y[0]]; myPath.subPointDisl = []; myPath.subPointXl = []; myPath.subPointYl = []; for (var t = -1.0; t<=myPath.numOfPoints-3; i++) { for (var t = pathStepSize; t<1.0+pathstepsize/2; b1 =" -t*(t-1)*(t-2)/6;" b2 =" (t+1)*(t-1)*(t-2)/2;" b3 =" -(t+1)*t*(t-2)/2;" b4 =" (t+1)*t*(t-1)/6;" x =" myPath.x[i-1]*b1+myPath.x[i]*b2+myPath.x[i+1]*b3+myPath.x[i+2]*b4;" y =" myPath.y[i-1]*b1+myPath.y[i]*b2+myPath.y[i+1]*b3+myPath.y[i+2]*b4;" dx =" x-myPath.subPointX[myPath.subPointDis.length-1];" dy =" y-myPath.subPointY[myPath.subPointDis.length-1];" d =" Math.sqrt(dx*dx+dy*dy);" t =" 1.0+pathStepSize;" b1 =" -t*(t-1)*(t-2)/6;" b2 =" (t+1)*(t-1)*(t-2)/2;" b3 =" -(t+1)*t*(t-2)/2;" b4 =" (t+1)*t*(t-1)/6;" x =" myPath.x[myPath.numOfPoints-4]*b1+myPath.x[myPath.numOfPoints-3]*b2+myPath.x[myPath.numOfPoints-2]*b3+myPath.x[myPath.numOfPoints-1]*b4;" y =" myPath.y[myPath.numOfPoints-4]*b1+myPath.y[myPath.numOfPoints-3]*b2+myPath.y[myPath.numOfPoints-2]*b3+myPath.y[myPath.numOfPoints-1]*b4;" dx =" x-myPath.subPointX[myPath.subPointDis.length-1];" dy =" y-myPath.subPointY[myPath.subPointDis.length-1];" d =" Math.sqrt(dx*dx+dy*dy);" totaldistance =" myPath.subPointDis[myPath.subPointDis.length-1];" style="color: rgb(255, 0, 0);">testsmooth.fla


type the following in first frame...


var line_data_arr:Array = new Array();
line_data_arr.push({x:54.1666666666667, y:500});
line_data_arr.push({x:108.333333333333, y:0});
line_data_arr.push({x:162.5, y:307.055555555556});
line_data_arr.push({x:216.666666666667, y:483.333333333333});
line_data_arr.push({x:270.833333333333, y:487});
line_data_arr.push({x:325, y:431.444444444444});
line_data_arr.push({x:379.166666666667, y:472.222222222222});
var myPath:MovieClip = _root.createEmptyMovieClip("myPath", _root.getNextHighestDepth());
var pp:Smooth_path = new Smooth_path(myPath, line_data_arr);


---------------------------

test flash ..........


Source Files


Read more
0

Windows XP Shortcuts


ALT+- (ALT+hyphen) Displays the Multiple Document Interface (MDI) child window's System menu
ALT+ENTER View properties for the selected item
ALT+ESC Cycle through items in the order they were opened
ALT+F4 Close the active item, or quit the active program
ALT+SPACEBAR Display the System menu for the active window
ALT+TAB Switch between open items
ALT+Underlined letter Display the corresponding menu
BACKSPACE View the folder one level up in My Computer or Windows Explorer
CTRL+A Select all
CTRL+B Bold
CTRL+C Copy
CTRL+I Italics
CTRL+O Open an item
CTRL+U Underline
CTRL+V Paste
CTRL+X Cut
CTRL+Z Undo
CTRL+F4 Close the active document
CTRL while dragging Copy selected item
CTRL+SHIFT while dragging Create shortcut to selected iteM
CTRL+RIGHT ARROW Move the insertion point to the beginning of the next word
CTRL+LEFT ARROW Move the insertion point to the beginning of the previous word
CTRL+DOWN ARROW Move the insertion point to the beginning of the next paragraph
CTRL+UP ARROW Move the insertion point to the beginning of the previous paragraph
SHIFT+DELETE Delete selected item permanently without placing the item in the Recycle Bin
ESC Cancel the current task
F1 Displays Help
F2 Rename selected item
F3 Search for a file or folder
F4 Display the Address bar list in My Computer or Windows Explorer
F5 Refresh the active window
F6 Cycle through screen elements in a window or on the desktop
F10 Activate the menu bar in the active program
SHIFT+F10 Display the shortcut menu for the selected item
CTRL+ESC Display the Start menu
SHIFT+CTRL+ESC Launches Task Manager


SHIFT when you insert a CD Prevent the CD from automatically playing
WIN Display or hide the Start menu
WIN+BREAK Display the System Properties dialog box
WIN+D Minimizes all Windows and shows the Desktop
WIN+E Open Windows Explorer
WIN+F Search for a file or folder
WIN+F+CTRL Search for computers
WIN+L Locks the desktop
WIN+M Minimize or restore all windows
WIN+R Open the Run dialog box
WIN+TAB Switch between open items
Read more
0

Updating and restoring iPhone software


You can use iTunes to update or restore iPhone software. You should always update iPhone to use the latest software. You can also restore the software, which puts iPhone back to its factory condition.

If you choose to update, the iPhone software is updated but your settings and media are not affected.

If you choose to restore, all data is erased from iPhone, including songs, videos, contacts, photos, calendar information, and any other data. All iPhone settings are restored to their factory condition.

To update or restore iPhone :

Make sure you have an Internet connection and have installed iTunes 7.3 or later from www.apple.com/itunes. Apple recommends using the latest version of iTunes.
Connect iPhone to your computer.
In iTunes, select iPhone in the Source pane and click the Summary tab.
Click "Check for Update." iTunes tells you if there’s a newer version of the iPhone software available.
Click Update to install the latest version of the software. Or click Restore to restore iPhone to its original settings (this erases all data on iPhone). Follow the onscreen instructions to complete the restore process.
Restoring or transferring your iPhone settings
When you connect your iPhone to your computer, settings and other information on your iPhone are automatically backed up to your computer, including mail settings, text messages, notes, call history, contact favorites, sound settings, and widget settings. You can restore this information if you need to (if you get a new iPhone, for example, and want to transfer your previous settings to it).


To restore previous iPhone settings:

Connect the iPhone to the computer you normally sync with.
In iTunes, select the Summary tab and click Restore (this erases all data on iPhone). When prompted, select the option to restore your settings.
Notes:
Some information you can sync (photos, videos, songs) are not backed up and will need to be resynced.
Passwords are not backed up and will need to be entered again.
If you restored to a different iPhone, you will need to reactivate Visual Voicemail.
Deleting backups
If you need to delete a backup from a computer, follow these steps:

Open iTunes Preferences:


Windows: From the Edit menu, choose Preferences.
Mac: From the iTunes menu, choose Preferences.
Click iPhone (iPhone does not need to be connected).
Select the backup you want to remove and click Remove Backup.


Note: If you don't want iPhone to automatically sync, select the "Disable automatic syncing for all iPhones" checkbox. For more information, see Help in iTunes.


Article source:http://docs.info.apple.com/article.html?artnum=305744

Read more
 

Recent Posts

Recent Visitors

Donate Me

About Me

My photo
Chennai, Tamil nadu, India
Nothing more to say about me.. Just a Action Script programmer / Flex developer having 4.5 years of experience.